Rails & React on Kubernetes. A definitive Step-by-Step guide. 1/2
Learn how to deploy a Rails backend and a React web app on Kubernetes using DOKS and Helm charts
Rails source code: https://github.com/wowinter13/rails-k8s-demo
React source code: https://github.com/wowinter13/react-k8s-demo
I. Introduction
There are many ways to deploy backend and frontend applications: one of them is using Docker containers and Kubernetes for orchestration.
Kubernetes is easy to set up and developers can use identical tooling and configurations across any cloud. Making Kubernetes operationally ready requires a few more tools to be set up, which are described in this tutorial.
In this tutorial, we aim to provide developers with a hands-on guide on how to get started with an operations-ready Kubernetes cluster on DigitalOcean Kubernetes (DOKS).
II. What is Kubernetes (K8s)?
As stated on their website, “Kubernetes is an open-source system for automating deployment, scaling, and management of containerized applications.”
Kubernetes is a self-contained orchestration tool with many built-in services that provide all the features we need to run a container-based application. Kubernetes helps to manage containerised applications in various types of physical, virtual, and cloud environments. It has the more impressive contributor community and cloud support, providing a rich toolkit and a large number of out-of-the-box solutions.
Kubernetes is a highly flexible container tool to consistently deliver complex applications running on clusters of hundreds to thousands of individual servers.
This guide covers all the common aspects required for running Rails and React applications in staging/production environments, including the deployment and continuous delivery of the web application, the configuration of a load balancer and domain, the environment variabless, the compilation of assets, the database migrations.
III. Kubernetes Basics

1. Cluster
From a hardware point of view, cluster is a collection of hosts (servers) that helps us to aggregate their available resources. That includes RAM, CPU, disk, and their devices into a usable pool.
From a components point of view, Kubernetes cluster consists of a set of nodes, which all run containerized applications.
2. Node
Node is a single host which is capable of running on a physical or VM. A node should run both kube-proxy and kubelet which are considered as a part of the cluster.
- Kubelet is an agent, which is responsible with the node’s registration with the cluster.
- Kube-proxy is a process, which is responsible with establishing a cluster-wide virtual network across the nodes. kube-proxy makes sure each node gets its own unique IP address and implements local iptables or IPVS rules to handle routing and traffic.
3. Control Plane
The control plane is the collective name for a cluster’s master nodes. The control plane consists of cluster control components that expose APIs and interfaces to define, deploy, and manage the lifecycle of containers.
Control Plane Components:
- API server (kube-apiserver) is the control plane front-end service. All components (internal system components and external user components) communicate exclusively via the API Server and use the same API.
- etcd is a consistent and highly-available key-value store used as Kubernetes’ backing store for all cluster data. It stores configuration details and wright values and communicates with the most component to receive commands and work. It also manages network rules and port forwarding activity.
- Scheduler (kube-scheduler) is a system service whose job is to distribute pods to nodes for execution.
- Controller Manager (kube-controller-manager) is a service that runs controller processes. The controller manager is actually a “controller of controllers”, providing the functionality of a node controller, an endpoints controller, a replicaset controller, a persistent volume controller and a horizontal pod autoscaler controller.

Now, let’s go and write some real code.
IV. Preparation
This guide assumes that you already have general knowledge about web development and basic knowledge of servers and containers.
We also expect that you already have a development machine with all the necessary applciations installed, including Ruby (e.g. using rbenv), Ruby on Rails, Git, Docker, PostgreSQL, React, kubectl and etc.
You also need to have an account on DigitalOcean.
First of all, we create the Docker images we need for our deployment and push them to Digital Ocean Container Registry (DOCR).
We will start with the backend container.
V. Create and a containerize a Rails application
At first, you can use an existing Rails application, if you want. But for the sake of simplicity, let’s create a new one with this command:rails new rails-k8s-demo --api --database=postgresql
Then add a simple API response to the example application:
Path: config/routes.rb
Rails.application.routes.draw do
  namespace :api, defaults: { format: :json } do
    namespace :v1 do
      resources :digits, only: :index
    end
  end
end
Path: app/controllers/api/v1/digits_controller.rb
class Api::V1::DigitsController < ApplicationController
  def index
    render json: { digits: [Random.rand, Random.rand] }
  end
end
Docker Container
First step for containerization is to create the Docker image. A Docker image is simply a package which contains our application, together with all the dependencies and system libraries needed to run it.
Add this file in the root folder of your Rails application: Dockerfile
A short description of the steps above:
1. FROM — we tell Docker to download a public image, which is then used as the base for our custom image. In particular, we use an image that contains one of the latest versions of Ruby.
2. RUN apt update && upgrade && install *libs* – RUN is used to execute a command inside the image that we are building. We will only install some basic libs to have the bare minimum required to run our server.libxml2-dev and libxslt-dev are just dependencies for a nokogiri library.
3. After that, we copy our Rails application to the image and we install all the required gems using Bundler. The Gemfile is copied before the other application code because Docker can use caching to build the image faster in case there aren’t any changes to the Gemfile.
4. Finally, we configure a default command to be executed on the image to run rails server .
Now it time to build the image:
docker build -t username/rails-k8s-demo:latest . --platform linux/amd64The last dot is a required argument and indicates the path to the Dockerfile.
And -t option is used to assign a name and a tag for the image.
VI. Create and a containerize a React application
Now that we have our back end ready, let’s move on to the React app. Navigate to the root directory of the project and run the following command:
npx create-react-app react-k8s-demonpx on the first line is not a typo — it’s a package runner tool that comes with npm 5.2+.
Again, we’ll try to keep our code as simple as possible. Nevertheless, we’ll install the axios library to make requests.
npm i axios --saveNext, navigate to the frontend app folder, and open the src/App.js file — the only file we need to modify. In the App component, we make a request to the back end to test that everything is working properly. The following code will satisfy our needs:
The only thing that is not so obvious – axios.create({baseURL: "https://api.sometestdomain.me/api/v1}) . Using this command we create a new instance of axios with a custom url. sometestdomain.me is a real domain that will be used later to host our backend and frontend applications.
Finally, let’s create a Dockerfile for the client app. As we can see, it looks similar to the back end one:
As we did with our back end image, let’s build a frontend image:
docker build -t username/react-k8s-demo:latest . --platform linux/amd64Now we are ready to push our images and start deploying on Kubernetes.
VII. Tag and push images to DOCR
This step is quite simple, but it requires us to install a lot of DigitalOcean CLI tools. We will come through these steps at a fast pace, but if you want to understand things better – use these links.
1. Install doctl
At first, we need to install doctl using brew:
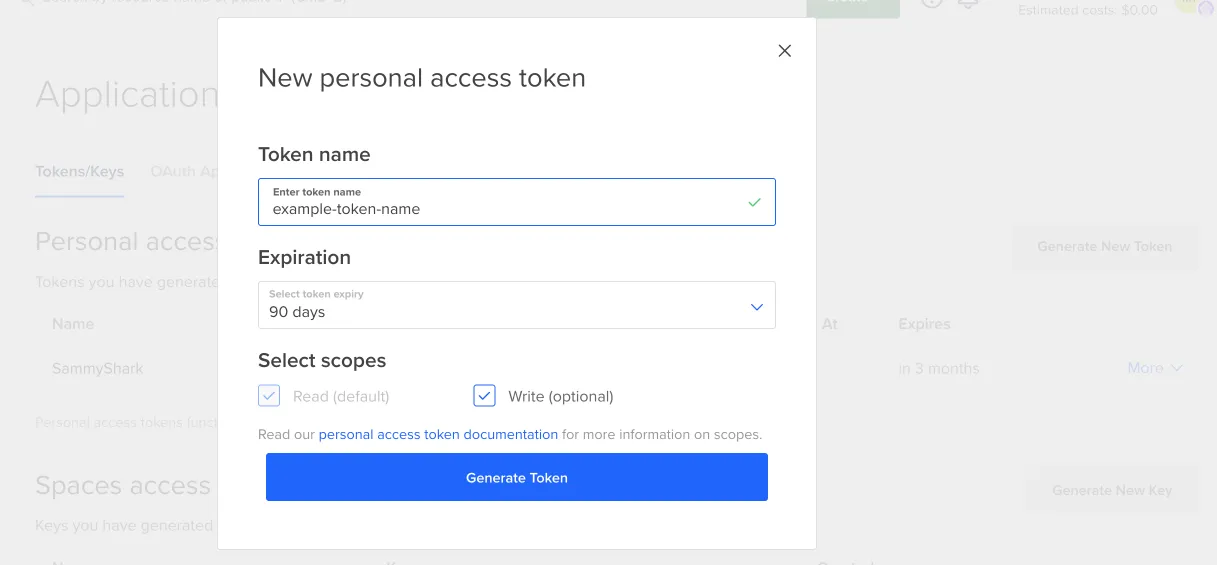
brew install doctlAfter that, we need to create a DigitalOcean API token for our account with read /write access from the Applications & API page in the control panel. The token string is only displayed once, so we need to save it in a safe place.
Next, we are going to use the init sub-command for doctl auth, to perform the initialization:
doctl auth initThe output should look similar to:
Please authenticate doctl for use with your DigitalOcean account. You can generate a token in the control panel at https://cloud.digitalocean.com/account/api/tokens

Enter your access token: <paste_your_personal_token_here>

Validating token... OK
2. Create the DOKS cluster
We will create a cluster using doctl with a command below, but you also can create a new one from DigitalOcean Admin Panel:
A correct output will be something like that:
Briefly, we created a DOKS cluster with 3 AMD worker nodes (1CPU/2GB) and auto-scale to 2-4 . To choose a different node type, pick from the following command doctl compute size list.
For a better understanding of what happened in --node-pool , use doctl k8s options -h .
3. Create and configure the DOCR
Finally, we are ready to create a container registry. It is used to securely store and distribute our Docker application images (in our case, it is just a regular Docker Hub, but it was made for us by Digital Ocean).
To create a basic container registry run this command (it also could be done from DigitalOcean Admin Panel):
doctl registry create k8s-demo-registry --subscription-tier basicThe output should look similar to:
Name                 Endpoint
k8s-demo-registry    registry.digitalocean.com/k8s-demo-registry
Now we need to create a kubernetes secret to be able to work with private images (to fetch images from the registry):
doctl registry kubernetes-manifest | kubectl apply -f -The above command creates a Kubernetes secret for us, in the default namespace.
Next, we need to verify that the secret was created:
>> kubectl get secrets k8s-demo-registry-reg-1NAME                     TYPE                             DATA   AGE
k8s-demo-registry-reg-1  kubernetes.io/dockerconfigjson   1      10s
After that, our application Pods can reference it using imagePullSecrets .
4. Push images to DOCR
Let’s come back for a second to our newly created images and push them to the Container Registry.
To interact with our registry using the docker command-line interface (CLI), we will need to first configure docker using the DigitalOcean command-line tool:
docker login -u DO_API_TOKEN -p DO_API_TOKEN \ registry.digitalocean.comIn case, your doctl is configured correctly – you also can authenticate using this command:
doctl registry loginHowever, personally I prefer the first command, because it gives your more clarifications about actions under the hood.
Now, we are ready to push images created in sections V and VI to k8s-demo-registry .
The code for the backend app:
docker tag wowinter13/rails-k8s-demo registry.digitalocean.com/k8s-demo-registry/rails-k8s-demo
docker push registry.digitalocean.com/k8s-demo-registry/rails-k8s-demo
And the similar code for a frontend one:
docker tag wowinter13/react-k8s-demo registry.digitalocean.com/k8s-demo-registry/react-k8s-demo
docker push registry.digitalocean.com/k8s-demo-registry/react-k8s-demo
VIII. Helm charts for the backend application
Just a fact: オトロ (Otoro) is the name of the fattiest part of a tuna.
So, this is the Otoro of our guide.
Finally we are touching a Kubernetes inside!
Helm
Deploying our application one time is fine but if we want to deploy the application again and again we need to send all the manifest files to the Kubernetes API server again and again. Helm is the tool that solves this problem.
Helm is the package manager for Kubernetes and provides the solution for package management, security, configurability while deploying applications to Kubernetes. Helm makes it easy for us to get going with Kubernetes.
We can scaffold charts and templates using helm create %mychart%, but for small (read: simple) apps it is easier to create manifests manually.
Prepare a place for our charts (run this command from the root of our rails-k8s-demo app):
>> mkdir -p helm/demo-backend
>> cd helm/demo-backend
What do we need to know about Helm charts?
Helm uses a packaging format called charts. A single chart might be used to deploy something simple, like a memcached pod, or something complex, like a full web app stack with HTTP servers, databases, caches, and so on.
They have a pretty simple structure and charts are organized as collections of files inside of a directory.
The directory name is the name of the chart (without versioning information). Thus, a chart describing DemoBackend would be stored in a demo-backend/ directory.
helm/demo-backend/
  Chart.yaml
  values.yaml
  charts/
  templates/
...- The
templates/directory is for template files. When Helm evaluates a chart, it will send all of the files in thetemplates/directory through the template rendering engine. It then collects the results of those templates and sends them on to Kubernetes. - The
values.yamlfile is also important to templates. This file contains the default values for a chart. These values may be overridden by users duringhelm installorhelm upgrade. - The
Chart.yamlfile contains a description of the chart. You can access it from within a template. Thecharts/directory may contain other charts (which we call subcharts).
More details can be found in the Charts Guide by Helm.
The Chart.yaml File
The Chart.yaml file is required for a chart. There is a some plain template with basic comments:
Chart.yaml is a powerful manifest and can store a lot of fields, be deprecated or handle dependencies, but for us it would be enough to just define a required bare minimum.
The values.yaml File
This file stores default configuration values for current chart. Values are accessible from the .Values object in a template.
From a developer point of view, the idea is simple — we follow the DRY principle. In our case, we will set some basic metadata values, that later would be used in more than one field.
- An
appNamefield will be used to labelapp.kubernetes.io/name - A
partOffield will be used to labelapp.kubernetes.io/part-of - An
app.componentNamefield will be used to labelapp.kubernetes.io/component - And an
app.api_urlfield will be used to set ingress, so we could expose our app to the world!
We will explain the purpose of this fields in the section below.
But to understand the idea of labels better, check this link. Briefly saying:
A common set of labels allows tools to work interoperably, describing objects in a common manner that all tools can understand.
Our first template – ConfigMap
The first template we are going to create will be a ConfigMap.
Let’s begin by creating a file called helm/demo-backend/templates/configmap.yaml:
In Kubernetes, a ConfigMap is simply an object for storing configuration data. Other things, like pods, can access the data in a ConfigMap.
The only thing we want to “hardcode” right now on the ConfigMap level is RAILS_ENV . Because this tutorial is not supposed to handle multiple environments, for us it will be fine to just set a “production” value. (if you want to see the solution for multiple environments — just leave a message in the comments section and we will implement this functionality in the sequel of this article).
Depending on our needs, we can add to the ConfigMap more data attributes such as DB_HOST, DB_USER, DB_NAME, PG_PORT or S3 configs ( S3_BUCKET_NAME, S3_REGION) and etc.
Remember, that ConfigMaps are meant for plain text data. If we have data that we don’t want anything or anyone to know about except the application — we should use secrets.yaml .
The second thing we need to mention is a metadata. The docs define metadata as:
“Data that helps uniquely identify the object…”
Actually, we can skip a metadata block almost fully and just keep the data block:
---
apiVersion: v1
kind: ConfigMap
metadata:
  name: {{ .Release.Name }}
data:
  RAILS_ENV: "production"
But why not? It’s a good manner to store metadata for a couple of reasons:
- Tools and libraries can retrieve this metadata (monitoring using Prometheus, logging using Loki,
add_kubernetes_metadatain Elastic, etc.) - We can use this information to create powerful queries for our applications.
The official Kubernetes documentation recommends that we use the following labels:
name: name of applicationinstance: unique name of instancecomponent: the component within your logical architecturepart-of: the name of the higher level application this object is part of
deployment.yaml
From the official documentation:
A Deployment provides declarative updates for Pods and ReplicaSets.
The deployment contains the name of the image of our Rails app and the number of containers we want Kubernetes to run.
Deployments are used to rollout a new version of our app, rollback to a previous version, and to scale our app by running more containers.
The content of the deployment.yaml file is shown below:
Once again a good half of this manifest is metadata and selectors. But there are also some interesting fields we need to understand:
- The Deployment creates two replicated Pods, indicated by the
.spec.replicasfield. (Best practice is to create at least three Pods) - We set
.spec.revisionHistoryLimitfield in a Deployment to specify how many old ReplicaSets for this Deployment we want to retain. The rest will be garbage-collected in the background. (By default, this value is set to 10) - The
templatefield contains required fields to pull Docker image data and sets the image ports.
service.yaml
A Kubernetes Service is an abstraction that defines a logical set of Pods running somewhere in our cluster, that all provide the same functionality. When created, each Service is assigned a unique IP address (clusterIP). This address is tied to the lifespan of the Service, and will not change while the Service is alive. Pods can be configured to talk to the Service, and know that communication to the Service will be automatically load-balanced out to some pod that is a member of the Service.
Here is a copy of an almost default template for the Service chart:
So, let’s check what is inside. At first, we started to use the selector: labels. As their name suggests, label selectors allow us to identify the objects we have tagged with particular labels. If we provide multiple selectors, all of them must be satisfied to qualify as a match.
The significant part of this config is the selector field for the service, which tells the service which pods it should associate with and send traffic to.
Ingress
We’re almost done! The only thing to do is to create one last service: an Ingress Service. More specifically, we will be using the NGINX Ingress Controller.
In Kubernetes, an Ingress is an object that allows access to our Kubernetes services from outside the Kubernetes cluster. We configure access by creating a collection of rules that define which inbound connections reach which services.
Explanations for the above configuration:
spec.rules: A list of host rules used to configure the Ingress. If unspecified, or no rule matches, all traffic is sent to the default backend.spec.rules.host: Host is the fully qualified domain name of a network host (e.g.:api.sometestdomain.me).spec.rules.http: List of http selectors pointing to backends.spec.rules.http.paths: A collection of paths that map requests to backends. In the above example the/path prefix is matched with theapibackendservice, running on port3000.spec.tls.hosts: List of hosts included in the TLS certificate (we will install it later).
Now, we need to install Ingress:
helm repo add ingress-nginx https://kubernetes.github.io/ingress-nginx
helm repo update ingress-nginx
And create the Ingress namespace with Helm:
helm install ingress-nginx ingress-nginx/ingress-nginx \
--namespace ingress-nginx \
--create-namespace >>
NAME: ingress-nginx
LAST DEPLOYED: Tue May 30 16:09:07 2022
NAMESPACE: ingress-nginx
STATUS: deployed
REVISION: 1
TEST SUITE: None
We can verify Nginx deployment status with this command:
helm ls -n ingress-nginx>>
NAME            NAMESPACE        STATUS
ingress-nginx   ingress-nginx    deployed
Finally, let’s create our first application deploy (technically, second, because of helm install ingress-nginx we did earlier)!
helm upgrade --install rails-k8s-demo helm/demo-backend \
--namespace=default \
--atomic>>
Release "rails-k8s-demo" has been upgraded. Happy Helming!
NAME: rails-k8s-demo
LAST DEPLOYED: Mon May 30 16:39:07 2022
NAMESPACE: default
STATUS: deployed
REVISION: 1
TEST SUITE: None
It’t time to verify that the pods are running properly:
kubectl get podsshows the pods and their status;- the status for all pods should be
Running; - if we see the error
ImagePullBackOffprobably we have not configured properly the secret to download the image from our private repository;
So, it should be something like this:
NAME                              READY   STATUS    RESTARTS   AGE
rails-k8s-demo-6775c6b9f8-5crhs   1/1     Running   0          78s
rails-k8s-demo-6775c6b9f8-7c76j   1/1     Running   0          112s
Expose our app to the world!
After we created an Ingress controller – it is time to make it public and associate it with our domain name. For this, we need to find out our Ingress External IP.
Let’s use this command for our goal: kubectl get all -n ingress-nginx
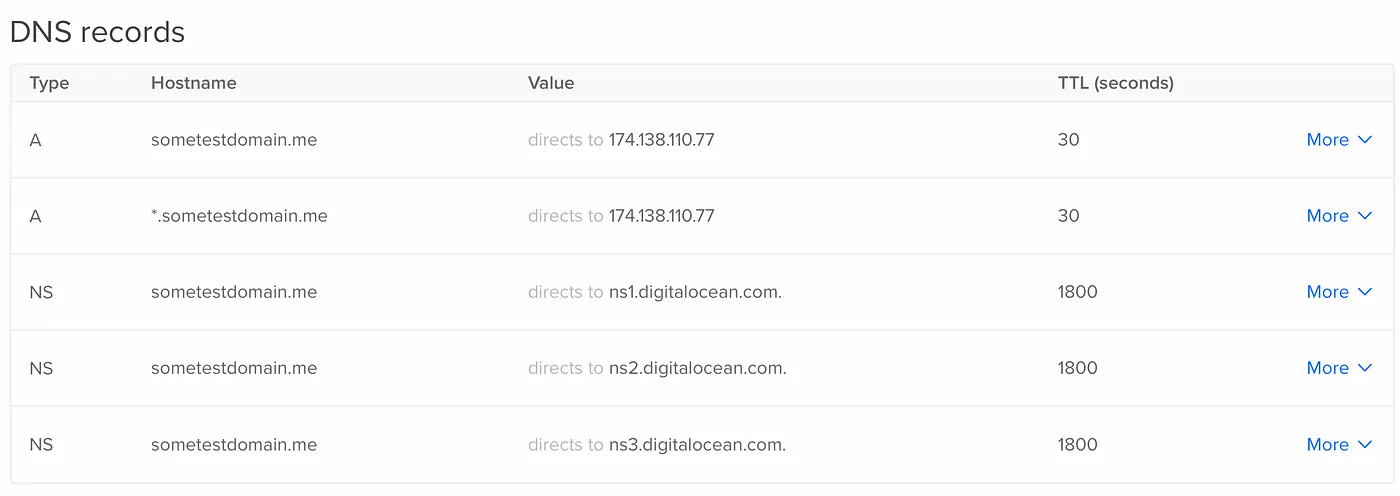
So, as we can see, our EXTERNAL-IP is 174.138.110.77 and we need to add this value to our DNS records.
In this article we don’t aim to cover pointing of the domain from common registrars to Digital Ocean, but this info is well covered in this article.
So, we simply need to add our external IP as a value with type A for our hostname:
Also, we should rollout the deployment so our updates would be applied:
kubectl rollout restart deployment/rails-k8s-demoFinally, we can receive our data from api.sometestdomain.me :
curl -k --location --request GET 'http://api.sometestdomain.me/api/v1/digits' >> {"digits":[0.6150316045433887,0.602894410281778]}
Certificate
The last step will be to configure production ready TLS Certificates for Nginx.
In the default setup, Nginx comes with self signed TLS certificates. For live environments we need to enable Nginx to use production ready TLS certificates. The recommended way is via Cert-Manager.
Add and update the Jetstack Helm repository:
helm repo add jetstack https://charts.jetstack.io
helm repo update jetstack
Finally, we can install the jetstack/cert-manager chart using Helm:
helm install cert-manager jetstack/cert-manager \
  --namespace cert-manager \
  --create-namespace \
  --version v1.1.0   \
  --set installCRDs=true
To check that everything went smoothly, we can run these commands:
>> helm ls -n cert-manager
>> kubectl get all -n cert-manager
Next, we will configure a certificate Issuer resource for cert-manager, which is responsible with fetching the TLS certificate for Nginxto use. The certificate issuer is using the HTTP-01 challenge provider to accomplish the task:
ACME issuer configuration:
email— the email address to be associated with the ACME accountserver— the URL used to access the ACME server’s directory endpointprivateKeySecretRef– Kubernetes Secret to store the automatically generated ACME account private key
(Also, personally, I prefer to store cert-manager charts in other directory, because later they can be reused in other applications (e.g. to be moved to another repository)
Let’s apply our changes:
kubectl apply -f k8s/cert-manager/letsencrypt-prod.yamlLet’s check that the Issuer resource was created and that no error is reported:
>> kubectl get issuer -n defaultNAME                READY   AGE
letsencrypt-prod    True    16m
Let’s check our endpoint via curl (our goal is to receive a redirect to HTTPS ).
curl -Li http://api.sometestdomain.me/api/v1/digits
The output looks similar to:
HTTP/1.1 308 Permanent Redirect
Date: Thu, 02 Jun 2022 16:53:43 GMT
Content-Type: text/html
Content-Length: 164
Connection: keep-alive
Location: https://api.sometestdomain.me/api/v1/digitsHTTP/2 200
date: Thu, 02 Jun 2022 16:53:44 GMT
content-type: application/json; charset=utf-8
x-frame-options: SAMEORIGIN
x-xss-protection: 1; mode=block
x-content-type-options: nosniff
x-download-options: noopen
x-permitted-cross-domain-policies: none
referrer-policy: strict-origin-when-cross-origin
etag: W/"94c3795f35089db8ccc487ff2d76b87d"
cache-control: max-age=0, private, must-revalidate
x-request-id: 60aa1e898ce917da02248db279e54ab0
x-runtime: 0.002190
vary: Origin
strict-transport-security: max-age=15724800; includeSubDomains{"digits":[0.9133913886653907,0.9057980851519238]}
We are done!
IX. Helm charts for the frontend application
Now, let’s do similar steps for our frontend application, but at a higher tempo!
Once again, we prepare a place for our charts (run this command from a root of your react-k8s-demo app):
>> mkdir -p helm/demo-frontend
>> cd helm/demo-frontend
The Chart.yaml File
This Chart.yaml is also very simple and thin.
The values.yaml File
This yaml file is almost similar to a backend one except for a url field we use to describe a frontend url.
ConfigMap
Actually, our config map for the frontend app is empty, but let’s create it just for a consistency:
Deployment
As we can see, the only difference from the backend chart is spec.template.spec.containers.image , which has the value for the react-k8s-demo app.
service.yaml
Absolutely similar to the backend chart.
Ingress and Certificate
Also this code is similar to the backend chart except for the fact that we use .Values.app.url instead of .Values.app.api_url for the hosts field.
Now, let’s apply our changes and finish this part of Helm story!
helm upgrade --install react-k8s-demo helm/demo-frontendWe don’t need to create new Ingress or Cert-Manager namespaces because they were already created during backend preparation and will serve both backend and frontend applications.
In summary, our pods list should look like this:
Finally, let’s go to https://sometestdomain.me and watch a rotating atom with some useless digits:

We are done!
X. Conclusion
Kubernetes is a complex system but you can start with the basics. We have covered all basic aspects required for deploying full-stack applications in production using Kubernetes.
In the second part of this series, we will go through k8s secrets, Rails migrations, Cron jobs and will configure CI/CD using CircleCI for both applications.
So stay tuned!
References (i.e. Further Readings)
- Kubernetes Documentation (kubernetes.com)
- Kubernetes Advocate (medium.com)
- Kubernetes Rails (kubernetes-rails.com)
- Kubernetes: An overview (TheNewStack.io)
- Kubernetes for Beginners (guru99.com)
- Kubernetes Control Plane and Data Plane Concepts (novaordis.com)
- Uxío García Andrade’s blog (medium.com)
- Getting Started With Kubernetes on DigitalOcean (digitalocean.com)
- Kubernetes Starter Kit for Developers (digitalocean.com)
- lewagon/rails-k8s-demo (github.com)